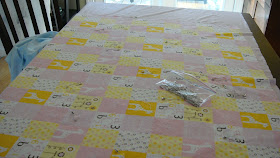
I was looking for a quick easy baby gift for my girlfriend's twins. I really wanted to make an adorable quilt. However, I wasn't sure I had the time or could stay focused long enough to piece together two quilts. I decided to make what I call a cheat sheet quilt. Simple, quick and light weight for the coming season. I am in no way some great quilter but here is what I did.
Supplies
1 yd of flannel or cotton
1 yd of minky
2 packages (6yds total) of quilt binding. If you opt to make your own you wont need quite that much, so be sure to calculate it first.
thread
miscellaneous sewing supplies
Prewash all your fabrics and square up the flannel. On a flat surface lay the minky right side down, smooth and secure with tape if you wish. Place the flannel on top right side up. Smooth the layers of your fabric sandwich to eliminate any wrinkles or pucker spots. Starting in the middle of your fabric sandwich, pin the layers together with large safety pins. Move out in a radial pattern smoothing as you go.
Trim the minky to the size of the flannel, I prefer to leave it a little bigger and trim a second time before binding but that's up to you. At this point you should have the minky and flannel pinned wrongs sides together.
Time to move on to the sewing! This is where the pattern on the flannel can make a difference. Using the pattern as a guide sew the two pieces together giving it a "quilted" look. Alternately, you can just wing it stitching ever six inches or so if the pattern is more abstract. Completely "quilt" the layers together.
Next is the binding. Using a rotary cutter trim all sides of the quilt to be neat and even. Everyone has a different preference for this and I have tried a few different ways myself. However here are two great tutorials, one for hand quilting and one for machine quilting. Both of these great tuts can be found on Diary of a Quilter's blog. I choose to machine bind mine, I have included a photo of the binding being attached to the back and completing it on the front. I didn't dare show my corners. Note my seams are very generous, makes it easier to work with when you aren't an expert. :) Also pardon the color change, the little boy quilt needed some face time too.
 |
| attaching binding to the back |
 |
| attaching binding to the front! |
Bind the quilt in your chosen fashion and your done. It takes about three hours depending on how much time you play in your fabric stash. Enjoy!


Nice job Eliza! I love reading quilt tuts, and am working toward finishing up my first ever quilt (a large one) and a baby quilt, both are pieced. Your idea for a quick baby quilt is marvelous!
ReplyDelete