Up
cycle denim apron
Oh
goody goody a girly sewing project. I think these aprons are fun to
make and great gifts for gardeners, cooks, and crafters alike. Who
doesn't want to have their favorite tools on hand all while looking cute?
As projects go....this can be simple or elaborate, making it great for
beginners and advanced sewers. This is a project that adapts as your
skill set changes.
I think
I spend more time picking out my fabric pondering the patterns and textures
than anything, definitely my favorite part. Mix and match the pieces for
the ruffles and sash as much as you like. Prewash your fabric, especially the
jeans if they smell of thrift shop. Use whatever seam allowance makes you
feel comfortable, I used a quarter inch unless stated otherwise. Well....Let’s
get started.
Ruffles
Top
ruffle: 2 strips, 4 inches x the width of the bolt (~44 inches)
Bottom
ruffle: 2 strips, 4 inches x the width of the bolt (~44 inches)
Sash
2
strips. 6 inches x the width of the bolt (~44 inches)
note:
If you want a longer sash cut extra strips and piece together accordingly.
Other
1
pair of men's jeans, I prefer sizes 36-40
Embellishments
(optional)
Denim
sewing machine needle and other basic sewing supplies
optional - a rolled hem foot
Up-cycle
 |
| pin, mark, cut! |
Let’s
start by disassembling the jeans. Lay them out flat, back pockets facing
up, and kinda fold the crotch to one side so you can mark a straight -ish line
across jeans just above the bottom of the crotch. Mark this line, pin the
fold in place, and cut!
For the side seams you can either cut up the
side, or use a seam ripper. Sometimes I just get it started and rip
by hand, but I have to use very sharp scissors or shears to cut through the
waste. If you want to embellish the pockets this the best time
to remove them as well. Keep this waist button part; it has a secret purpose for
later.
Prep
work
Just
a little more prep work to keep things neat.
Sew a few stitches close to the edge to secure the “crotch fold”. These stitches will be hidden later. I also like to sew some stitches (sorry no
picture) up both sides of the jeans, along what would have been the hip
seams. A simple blanket stitch looks
nice and serves to keep the denim from unraveling.
 |
| secure the fold |
Preparing
the Ruffles
This
is probably the most labor intensive part of the whole get up. Obviously
the goal for this apron is to have two overlapping ruffles, but make as many as
you like, or as few as you like. Match up the ruffle strips, right sides
together and sew down one short side to make one long strip. Press the seam flat.
 |
| make two long strips |
Sew a rolled hem on both short
sides and one long side, if you want to serge the remaining edge do it now, but
I never do. Repeat for the second ruffle strip
 |
| you don't need a special foot but it helps |
 |
| rolled hem |
Everyone has a
different method to the ruffle madness. This is the method I use seen
HERE in an earlier post. The post would
have been way too long to include all the options so I wanted a link outside of this tutorial. After the strips have
been ruffled in the manner you chose its time to attach them.
Attaching
the Ruffles
Select
the bottom ruffle, find the middle, and pin the ruffle to the apron right sides
and raw edges together, matching up the middles.
 |
| middles matched |
Pin the rest of the
ruffle in place moving the fabric along to get the desired look. Fold
approximately a one inch "flap" over on each side, pulling the
ruffle so there isn’t a gap.
Attach the ruffle by sewing between the
basting stitches (from the ruffle tut).
Note: if you use the quarter inch rule from the ruffle tutorial
for the basting stitches, attaching the ruffle with a 3/8” allowance should put
you roughly between the basting stitches.
Its not the end of the world if you stitch over the basting it just
makes them a pain to pull out.
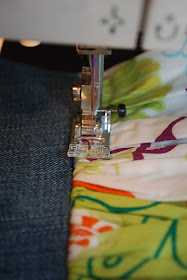
 |
| sew between the basting stitches if you can |
Now pull out the basting stitches
(most hated job ever). Also don’t do like I did here and select a color for
your basting stitches (red) that is hard to distinguish from your actual
stitches ( hot pink). Fold the ruffle down, smoothing into place.
See how the "flap" frames the edges nicely. If there is gap, working from the wrong side,
fold it and sew it down, no big
deal. Steam press and top stitch
the ruffle to keep it laying flat.
 |
| top stitch to keep it flat |
Repeat with the second ruffle
attaching just above the first. I usually eyeball the distance
between the two ruffles.
 |
| top stitching the second ruffle |
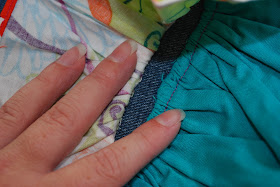
 |
| looking between the ruffles with the top one folded back |
Sash
Home
stretch! Cut one of the strips in half, making two shorter strips. Attach one of the resulting pieces to each
end of the longer remaining sash piece. Iron the seams open.
 |
| one really long strip |
Fold
the resulting strip in half length wise, right sides together and sew the
entire length of the long side.
The next step is confusing but hopefully the picture will help, with
the sash still wrong side out iron the seam open and centered
and then turn
right side out.
Tuck in the ends, iron well again and top stitch.
 |
| top stitching makes it pretty! |
This makes it look nice and neat, hides the long seam on the back and closes up
the ends.
Put it through your belt loops and you’re done!
Secret
purpose: attach the waist button piece for a tool holster - ingenious!
Optional
embellishments - This really is my favorite part, makes all the time I spend on
the ruffles worthwhile. Embroider a design on the pockets or apron.
Sew on bits of drapery fringe for a little fluff.
 |
| see the fringe on the bottom |
The easily distressed
nature of denim makes a reverse appliqué eye catching.
Buttons!
 |
| buttons, and a nifty utility holder |
Whatever you choose - just have fun!


Great tutorial Eliza! These are fun and frilly, and I think would also makes a cute skirt.
ReplyDeleteThanks Cynthia!
ReplyDelete